
This is a step by step process for how I created this patchwork greenhouse
to help inspire you to create your own from whatever treasures you are surrounded with

This spring I took on a rather large mission of building an old window greenhouse like I had been seeing on Pinterest. We live on a hill with huge exposure so when it is windy it is crazy windy and unhardy plants have alot of problems growing. Also we had nowhere to grow our seedings that was serious enough to keep them alive till they needed transplanting.
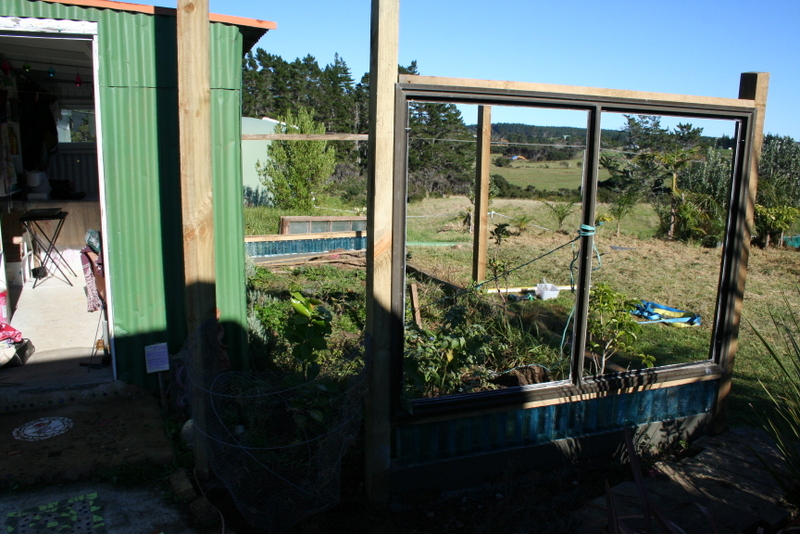
I had a garden off the side of my art room, seems so weird to look at this photo now, it feels like the greenhouse has been there forever


I built my greenhouse on the side so that it was one whole wall I didnt have to worry about making, also when it was a westerly the rain would drive up under this roof edge or leak at the top of the window, so that was going to have to be fixed anyway!

It took alot of weeding and transplanting to shift the treasures from this patch

I had found a lot of windows at the dump, the putty was so dry it chipped off without too much help, so I leant the art of puttying and I loved it, so peaceful and allowed me to be a perfectionist, love those opourtunities.

these windows we brought years ago at a garage sale but in a storm they blew over and SMASHED!!
what I found on trademe was a pack of 22 louvre windows which fit across one window in 3s, perfect! so these windows were fixed with 3 panel in each hole, because its a greenhouse this isnt a problem, the gaps that is
 you can see the louvres here
I also collect bombay saphire bottles. the man at the dump keeps them for me, I have hundreds but have yet to even try it as a drink!

we spent the weekend measuring a putting in corner posts......snore....... cant stand this part but ohh so important!, at the bottom of the sides I used two planks to make some boxing, found some old bricks to put inside so there was 2cm gap on each side between boxing and brick

make sure your bombay bottle fits in perfectly so it will be flush with the internal boxing size

pour in concrete so it fills in the gap beside the bricks and then fills up the tough enough to start, start at one end and push the bombay bottles in so they sink till the whole next is under cement. Just the square sides should be showing so they are like bricks themselves and keep pushing them together side to side to close the gaps.

you may need to keep pulling the concrete to the completed side and adding more in the trough ready for more bottles, eventually it will look like this

you can then put in your framing to hold the window bottom and put in those window frames, I have one aluminium set down this end that will be able to open
little helpers on hand

on this side I put in the salvaged windows, the frame was a bit off as you can see, it needed help and seeing I was home alone and couldnt jam in a window and tilt a frame I got my MacGyver on

and backed the truck up to it, inch by inch

and it worked perfect!

arent brains amazing!

the windows are held in place bya piece of wood used as a frame hammered on both side top and bottom. SO the window is just sitting there but held in place by wood butted up against it, very strong

taking the wooden moulding off is so fun, voila! if you have issues with the cement not covering the bricks, thats ok, the garden will come up over that, otherwise plant something there

next is the sculpture corner, I never wanted a rectangular greenhouse, because of the wind I need the opening to be overlapped, so I made a sculpture on the end, chook mesh and wire into shape

mix up 'Dhaji' with cement, Dhajit is a sculpture mix on newspaper, clay, sand and its awesome!

the buckets of Dhajit were 8 years old and perfect, just a little green on top

so this is after the first coat, too much sculpture on and it will be too heavy and fall off, and that is a shocking sight, watching your work peel itself to death

while that dries for a day, put in your other windows

and voila, we are getting there

starting to look like something, very grubby though!

second and final coat on the sculpture pot, I could do this forever, such a lovely process

relaxing

next I attack the floor, a whole day of weeding and transplanting takes place, the edges will all be gardens so I get to leave the edge plants

the sides have been made with 12mm tanilised plywood cut to 10cm high strips, they are held in place with kebabsticks for now

make sure the dirt is leaning away from the new wooden sides for now, kebab sticks are kinda weak, stamp down the dirt with a plank of wood so its really flat

time to lay down some weed mat. I use a fabric mat which is felted rather than woven

cover in weed mat and then bring in buckets of sand, 12 for me to be exact

helps if you live on a sandhill like me!

so wwedmat was down and then you threw on the buckets of sand

next I salvaged some concrete paving from my family. The thing with this paving is that it was poured on site so the base is no where near flat, I am just going to do the best I can

start at the door going in and smooth sand and lay pavers adding sand to wobbly bits, taking sand away from bulgy bits

and the you are done, give it a sweep off so all the sand is in the cracks

I had a lot of smashed up tiles from an earlier job, and heaps of glass fairy poos

use a stick to flatten down any really puffy bits of sand

I have left some pretty huge gaps in my floor with the intention of filling them in with colour, it makes the moziac crazy flooring job much easier if you have this in mind, can you see those kebab sticks?

now I cut a pillow case in half to use as a drop sheets of sorts, news paper would become soggy and heavy in secons so fabric is your best bet, line the side of gaps with fabric and pour in cement/sand mix with a really runny texture

and then lay in your tile by placing on top of cement and wiggling till it sinks to the same level

and this is the finished floor

I love it, colour colour colour

the centre has been left grout free about 30cm wide so any hose water has a chance to escape, also I plan to line the centre with pot plants and I dont want their run off pooling

so its off to the forest for moss

and we squish moss into the gaps, if it grows yay, if it dosent thats ok too

note the windows!! I refuse to wash them till the roof is on, kinda like a roof shout, it keeps me working, Im soooo desperate to clean them!

take the kebab sticks out that were holding the side up, the cement and pavers will do that now and I also used a kebab stick to work holes in the soft grout in the really lower pooling spots

some things I cant be arsed with so we had a builder friend come and do the roof with us, I just wanted to do more fun stuff, he has an amazing mind and you kinda need that when you try to work in with my stuff

so I spend the day inside moving the dirt in the garden edge beds into place and adding sheep poo

and sweeping up around that moss

we are working to a time limit, its gonna piss down at 2pm, work men work!

me and Miss Indi take to the louvre cupboard doors

painting them PURPLE!!!

the laser light goes in, we only brought 3 sheets, its really expensive and you dont want the whole roof clear, there needs to be some spaces for the colder plants or for seedlings to hide in the heat of summer

micky mouse framing, look at the poor angled corner I created! sheesh haha

old iron roofing, its feeling gooood in here

and then the roof is done

see the looming clouds, 1.45 and we are done and it suddenly rips down! timing, not like the weather people to be so right!

so I have me a roof, whats next

I get some plywood offcuts from kellys work and use them to clad the outside, looks good

now dont know if you saw but the triangle shapes above the side windows are empty and this is so I can try my hand at Leadlighting. 2 days of you tube tutorials, I buy some gera and glass and just dive in. Glass is an arsehole is the lesson I learnt day one, you must learn the way of the glass, it dosent care much for your ideas, work with it and not like your the boss! and all will be ok

patchwork glass work

I really enjoyed the copper foiling, another relaxing job

and we are ready to solder

so I sit outside all afternoon in the wind so the fumes fly away

I got some beautiful textured glasses

and used broken windows from yet more windy storms

and drum roll please

there is my first attempt

willy wonky?? its perfect because its the start of a journey which I loved

and looks beautiful inside

especially at sunrise

where there were huge gaps, I invented my own technique called laddering, lets the spiders enter easily haha

I use the same process for holding the window in place, ply wood strips screwed on either side of top and bottom to keep it jammed in place

love leadlighted fairy poo

and now for this end
 I make a huge white window from old broken windows into a sunray pattern and use a leadlight disc I have had for years as the centre

next I make the benches, I use fence battens as framing, digging them into the ground and attaching them to the garden edging and the window frame

more 12mm plywood attached as the bench top

planting time, peas

and so many summer seedlings

the benches are made so that there is room for plants underneath

there are those louvers to hold seeds and just to look good, this is my seed bench

the last window in the art room was broken (how original) by kicking cows and had always been boarded up

a job I had just finished working on had done up their bathroom in this white board wall stuff so I got to scab some offcuts, and voila the window is now replaced and is whiteboard for recording planting info

info for all these seeds


I love this place

so there are fairy lights so I can water at night if I have had a busy day and didnt get home in time

or just wanna hang in the plant prettyness

seeeds

the lavender is putting on a great show, it got to stay

seeds bench

I found a piece of driftwood on a special mission I took and I use it to tie strings to grow peas

did I mention its magic at night time

I love to collect old ceramics for my greenhouse, keeps it cute

ready for growth

glass drip feeders

I give the greenhouse its final stain, its a very dark green which kinda comes out black, afer a panic and ohh shit what have I done, I love it, and I painted the sculptured pot in purple and green too

here is my original day dream sketch

gotta have some sea horses

did I mention it was super nice at night?? ohh yeah sorry

so I have plenty of helpers, this one is Twinkle

growing basil

more seeds

close up of that end window

plenty of light

we now have eggplants

chillies

I made some shelves down the end from a pallet

tomato giant

more tomato and basil

chillies

so many eggplant

I also use the room to dry seeds and bird wings. I use these in my art, every week someone is giving me a dead bird, this one is a kingfisher


and boom its all action now

another helper Louie


well looking at this it seemed like a lot of work, feels like more work to upload all this!! but each stage was so fun and complete that it was an amazing experience and to create it all from junk, wow that was cool.
costs were for clearlight roofing, wood framing and posts and cement, otherwise the rest was salvaged.
There are so many ways to do one of these you can make anything work for you.
Hope you enjoyed my instructions, and please ask any questions you have
enjoy your own dreams coming true
xxx
Sheree
Wow.. this is amazing. Thank you for sharing the journey of your greenhouse. What an inspiration you are. I think it is beautiful, really beautiful. And I love the bird wing, so precious.x
ReplyDeleteSheree, you are an inspiration, it's utterly gorgeous, and all the more so because you designed and built it yourself, and recycled and reused and made beautiful things out of stuff other people throw away. You're my hero (and hubby was hanging over my shoulder while I read this and he's seriously impressed too!) We will get there, it has to be this year, for our little patch of country green far from traffic and low flying planes. I can't wait!
ReplyDeleteWow Sheree... that is wonderful! It is so beautiful and I love how you were creative in the process putting in all your salvaged bits, making it not only gorgeous, special and artsy but affordable and environmentally friendly. I hope you are super proud of your self! And just think of the goodies you will be eating! Lovely! Super well done!!!
ReplyDeleteThanks for sharing your process for your OOAK greenhouse. Love all the heart you put into it. I'd love to do something like this but here in the suburbs they have all kinds of restrictions and it would never meet code.
ReplyDeletethanks for the journey, wow! so beautiful x
ReplyDeleteSeeing that little daydream sketch to full blown reality is just so awesome!
ReplyDeleteAll the beautiful creative touches (love the floor and the leaded glass!) and all the glorious veggies and beautiful flowers that now grow happily there....it's just so cool!!
Happy Birthday, Sheree! I hope you have a wonderful day. :) May you are even celebrating in that lovely greenhouse. I so enjoyed seeing how it came into being -- truly magical!
ReplyDeleteHugs,
Birgit
We are inspired! And as a potter, I'm sure I'll be donating lots of pretty shards to the effort.
ReplyDeleteThis is utterly beautiful! All of it :) just gorgeous. Well done!
ReplyDeleteOh my gosh...it's so amazing!
ReplyDeletegosh, i don't remember how i got here, if you visited one of my two blogs or i clicked on a link. BUT how wonderful to see how you created this. I love the photos of you working on the corner pot, you look like you are dressed for a party ;-)
ReplyDeletelove those blue bottles, i wonder what you will think of the drink if you ever try it.
i love what the wind inspired you to create! you are quite creative too.
your photo of seeds in the dirt is fab
love the name: Twinkle
purple paint, fun
colors mixed in the wonder-full floor
such a joy to see your creation.
congratulations
and thank you for sharing.
oh my, I had to comment and tell you just how inspiring I found this post. Your work is delightful. I absolutely ADORE your glass work xxxx
ReplyDeleteWow...this has been an amazing project for you all. It looks so fabulous!
ReplyDeleteJust passing through blog land, thinking of you. I wasn't able to participate in Vanessa Valencia's 'A Fanciful Twist's Mad Tea Party on her blog in July. (She is taking a short sabatical of sorts for a month or so). And Lisa of 'A Whimsical Bohemian' hasn't yet mentioned any kind of a date for the 'Our World Our Art' event which she hosts. It is going to be different than her 'One World One Art' event which she held for five years running, more for the kindred spirit artists around the world, not just an 'eye-candy' giveaway event, although she does want artists to make something they normally create to giveaway.
Anyway, I guess you are just about going into your spring weather, while here in the states, we are going into our fall season.
Have a blessed rest of the week.
XO
Teresa in California
http://amagicalwhimsy.blogspot.com/
What a beautiful, soulful space you've created!!
ReplyDelete